Ever wondered how you can harness the power of the cloud and IoT with just a tiny Raspberry Pi and Amazon Web Services (AWS) for free? Well, hold onto your hats because we're diving headfirst into the world of remoteIoT VPC networks. This isn't just tech talk—it's your gateway to building smarter systems without breaking the bank.
Picture this: you're setting up a home automation system, or maybe you're building a prototype for a smart agriculture project. You want it to be scalable, secure, and, most importantly, cost-effective. That’s where RemoteIoT VPC networks come in. Combining Raspberry Pi's versatility with AWS's free tier offers an unbeatable solution for anyone looking to dive into IoT development.
In this guide, we’ll break down everything you need to know about setting up a remoteIoT VPC network using Raspberry Pi and AWS. We’ll cover the basics, dive into the technical setup, and even throw in some pro tips to make your project rock-solid. So, buckle up and let's get started!
- Vegamovies 20 4k Your Ultimate Streaming Destination
- Mkvmoviespoint 2025 Your Ultimate Destination For Movie Downloads
Understanding RemoteIoT VPC Networks
Before we dive into the nitty-gritty, let's take a moment to understand what exactly a RemoteIoT VPC network is. VPC stands for Virtual Private Cloud, which is essentially a private network hosted within AWS. When you combine this with IoT devices like Raspberry Pi, you create a secure environment where your devices can communicate seamlessly.
This setup is perfect for projects that require remote access, data collection, and real-time monitoring. Whether you're controlling smart lights from your phone or monitoring soil moisture levels in a remote field, a RemoteIoT VPC network ensures that everything runs smoothly and securely.
Why Use Raspberry Pi for RemoteIoT?
Raspberry Pi has become a go-to device for hobbyists and professionals alike when it comes to IoT projects. Here’s why:
- Vegamovei The Ultimate Guide To Revolutionizing Your Lifestyle
- Unveiling The Truth Behind Mms Desi Videos A Comprehensive Guide
- Cost-Effective: Raspberry Pi is affordable, making it ideal for budget-conscious developers.
- Versatile: With a wide range of interfaces and libraries, Raspberry Pi can handle almost any IoT task.
- Community Support: A vast community of developers means plenty of resources and tutorials to help you along the way.
When paired with AWS, Raspberry Pi becomes a powerhouse for building scalable and secure IoT solutions.
Getting Started with AWS Free Tier
AWS offers a free tier that includes many of the services you’ll need to set up your RemoteIoT VPC network. Here’s a quick rundown of what’s included:
- EC2 Instances: Perfect for running your Raspberry Pi applications in the cloud.
- S3 Storage: Store your project data securely and access it from anywhere.
- IoT Core: Manage and monitor your IoT devices with ease.
The best part? You can use these services for free for up to 12 months, giving you plenty of time to experiment and build your project.
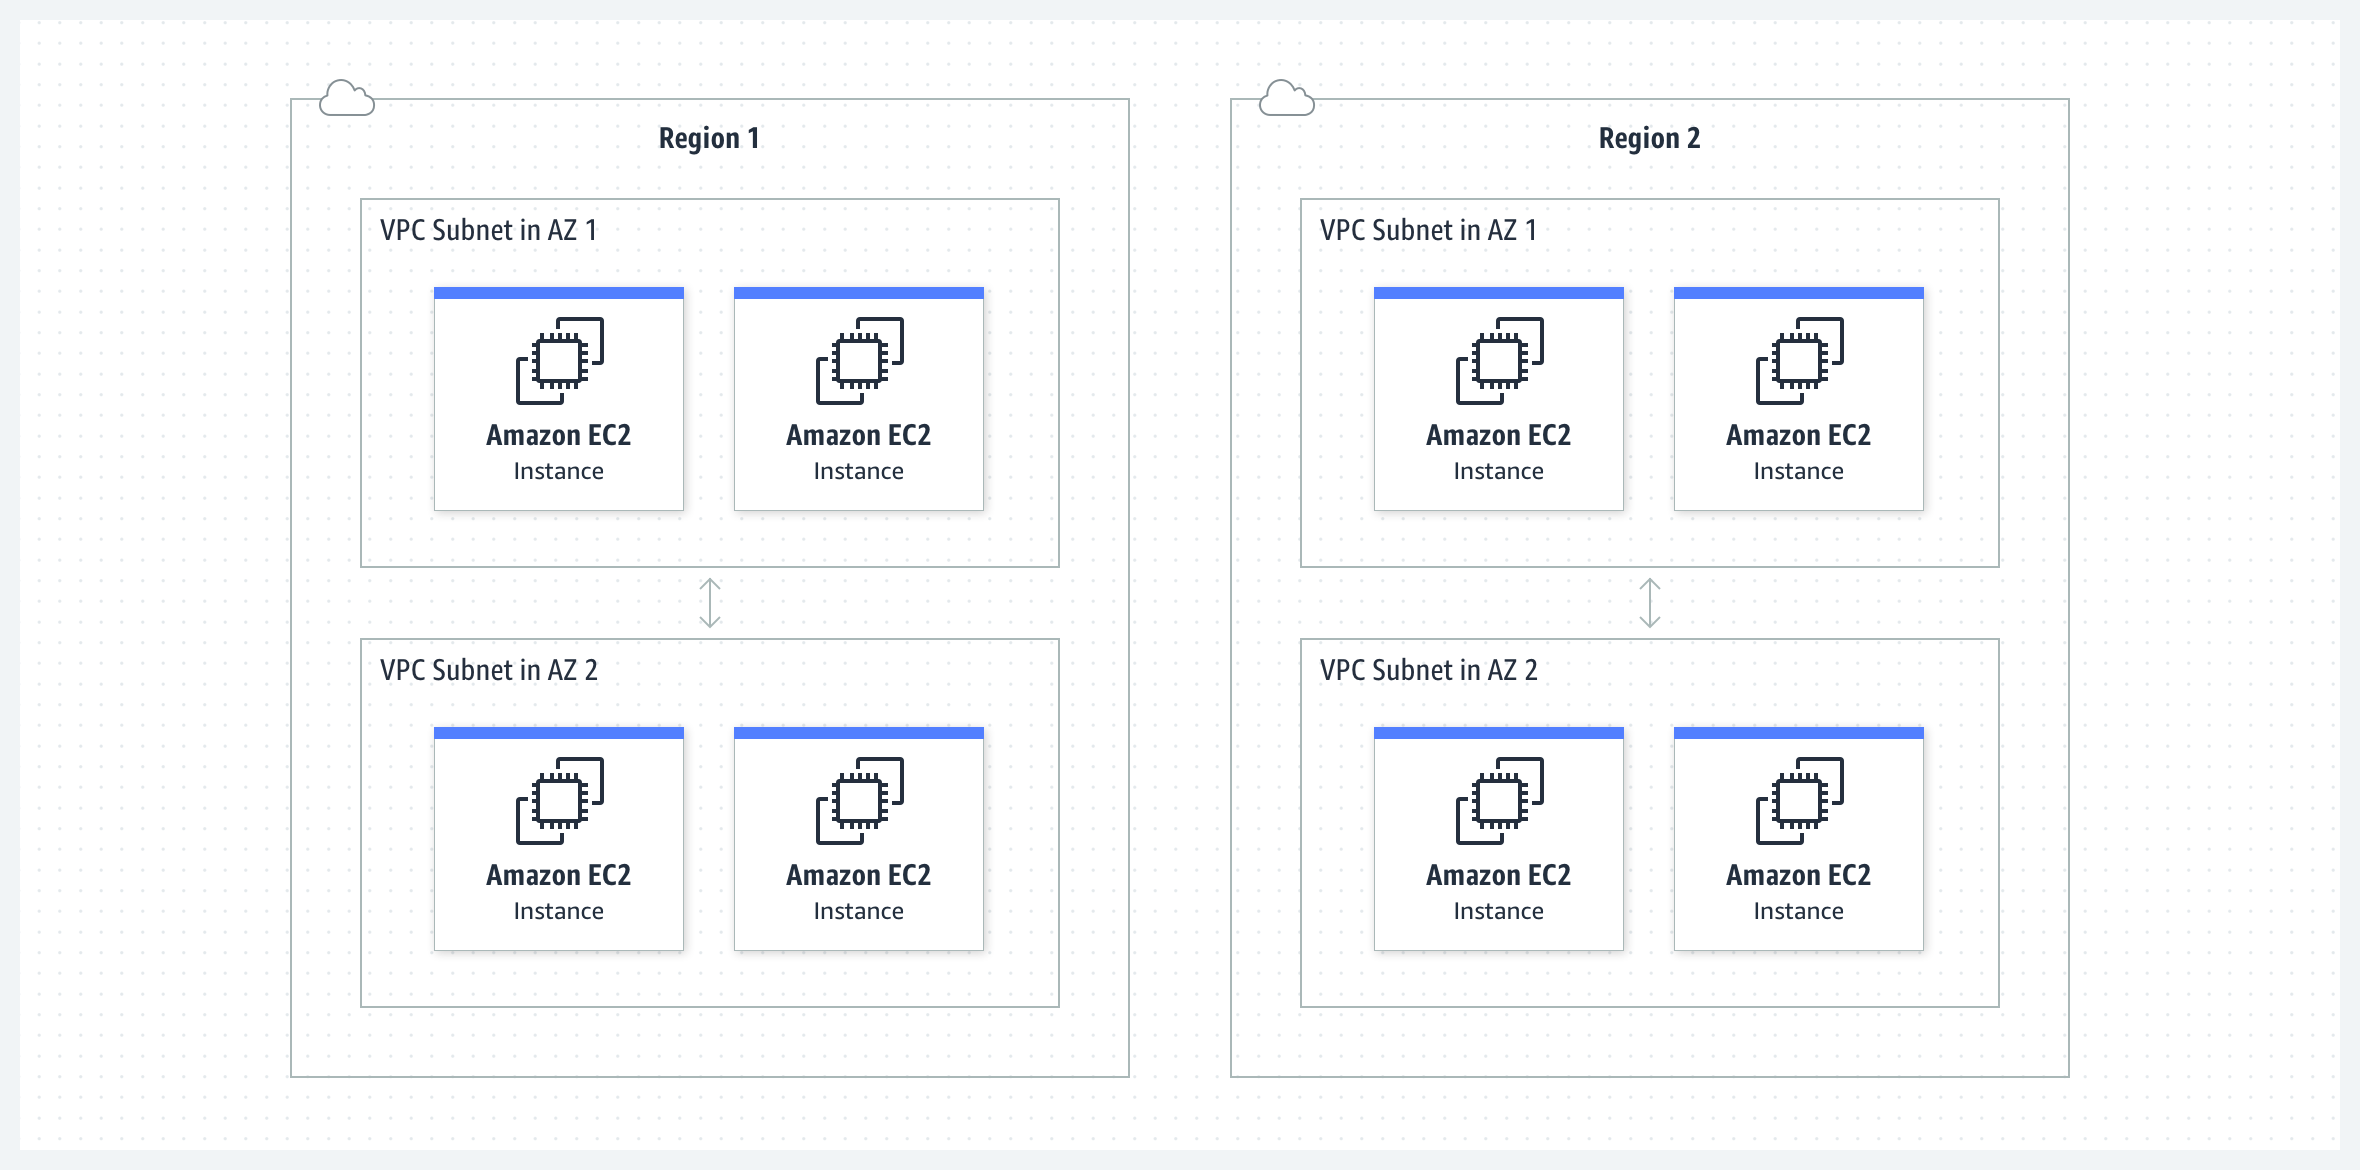
Setting Up Your VPC Network
Step 1: Create a VPC
The first step in setting up your RemoteIoT VPC network is creating a VPC. Follow these steps:
- Log in to your AWS Management Console.
- Navigate to the VPC Dashboard.
- Click on "Create VPC" and enter the necessary details.
Once your VPC is created, you’ll have a private network where you can deploy your IoT devices.
Step 2: Configure Subnets
Subnets allow you to divide your VPC into smaller segments, each with its own IP range. This is crucial for organizing your devices and ensuring security. Here’s how to set them up:
- Create public and private subnets based on your project requirements.
- Assign IP ranges to each subnet.
- Set up route tables to define how traffic flows between subnets.
With subnets in place, you can control access to your devices and ensure that sensitive data remains secure.
Connecting Raspberry Pi to AWS
Connecting your Raspberry Pi to AWS is the next step in setting up your RemoteIoT VPC network. Here’s how you can do it:
Step 1: Install AWS CLI on Raspberry Pi
The AWS Command Line Interface (CLI) allows you to interact with AWS services directly from your Raspberry Pi. To install it:
- Update your Raspberry Pi’s package list using
sudo apt update. - Install the AWS CLI by running
sudo apt install awscli. - Configure the CLI by running
aws configureand entering your AWS credentials.
With the CLI installed, you can now manage your AWS resources from your Raspberry Pi.
Step 2: Deploy an EC2 Instance
An EC2 instance acts as a virtual server where you can run your Raspberry Pi applications. Here’s how to set one up:
- Go to the EC2 Dashboard in your AWS Management Console.
- Click on "Launch Instance" and choose an AMI (Amazon Machine Image) that suits your project.
- Configure the instance settings, including the VPC and subnet you created earlier.
- Launch the instance and note down its public IP address.
Your EC2 instance is now ready to host your Raspberry Pi applications.
Securing Your RemoteIoT VPC Network
Security is a top priority when setting up a RemoteIoT VPC network. Here are some best practices to keep your network safe:
- Use Security Groups: Define rules that control inbound and outbound traffic to your EC2 instances.
- Enable Encryption: Encrypt sensitive data both at rest and in transit using AWS services like KMS (Key Management Service).
- Regularly Update: Keep your Raspberry Pi and AWS services up to date to protect against vulnerabilities.
By following these practices, you can ensure that your RemoteIoT VPC network remains secure and reliable.
Monitoring and Managing Your IoT Devices
Once your network is set up, you’ll want to monitor and manage your IoT devices effectively. AWS IoT Core makes this easy by providing tools to track device performance and troubleshoot issues. Here’s how you can use it:
- Device Shadowing: Sync device state information between your Raspberry Pi and AWS.
- Rules Engine: Define rules to automate actions based on device data.
- Monitoring Dashboards: Visualize device metrics and identify trends.
With these tools at your disposal, managing your IoT devices becomes a breeze.
Scaling Your RemoteIoT VPC Network
As your project grows, you’ll need to scale your RemoteIoT VPC network to accommodate more devices and data. AWS makes scaling straightforward with features like Auto Scaling and Elastic Load Balancing. Here’s how you can leverage them:
- Auto Scaling: Automatically adjust the number of EC2 instances based on demand.
- Elastic Load Balancing: Distribute incoming traffic across multiple instances for better performance.
By implementing these features, you can ensure that your network remains efficient and responsive as your project expands.
Pro Tips for Success
Here are a few pro tips to help you get the most out of your RemoteIoT VPC network:
- Optimize Costs: Use AWS Cost Explorer to track and manage your expenses.
- Backup Regularly: Set up automated backups for your data to prevent loss.
- Stay Updated: Follow AWS blogs and forums to stay informed about new features and best practices.
These tips will help you build a robust and efficient RemoteIoT VPC network.
Conclusion
In this guide, we’ve explored how to set up a RemoteIoT VPC network using Raspberry Pi and AWS. From understanding the basics to implementing advanced features, you now have the knowledge to build a secure and scalable IoT solution.
So, what are you waiting for? Start experimenting and see where your creativity takes you. And don’t forget to share your experiences and projects in the comments below. Who knows, you might inspire someone else to join the IoT revolution!
Happy building and good luck!
Table of Contents
- Understanding RemoteIoT VPC Networks
- Why Use Raspberry Pi for RemoteIoT?
- Getting Started with AWS Free Tier
- Setting Up Your VPC Network
- Connecting Raspberry Pi to AWS
- Securing Your RemoteIoT VPC Network
- Monitoring and Managing Your IoT Devices
- Scaling Your RemoteIoT VPC Network
- Pro Tips for Success
- Conclusion
- Somali Nude Telegram Unveiling The Controversy And Navigating Digital Privacy
- Somali Telegram 2025 The Ultimate Guide To Understanding The Latest Trends